The Last Stand of the Point & Click Admin
(NOTE: This post originally appeared in the May 2011 issue of the Salesforce.com Foundation newsletter)
Introduction
Clicks not code. Clicks not code. Clicks not code…
It’s my everyday mantra, one instilled at the very core of what Salesforce does. When presented with a problem, we want to use clicks, or things we can point and click and configure in the interface (workflow, cross-object formula, etc.), instead of using code to get things done.
However, sometimes what we want to do simply isn’t possible without the help of a little code. For some of the geekier amongst us (ahem), that’s actually an exciting proposition. For most of the rest of us, that idea instills fear, doubt, and dare I say a tinge of Rockwell-esque paranoia. If you’re certain it can’t be done via workflow, rollup summary or validation rules, rest assured, nobody is watching you, you CAN write basic triggers and be proud. Here’s how.
Setup Your Environment
While we can download and configure Eclipse, that’s a bit beyond the realm of this blog post, so we’re going to stick with the web interface and cloud deploy. If you’re interested in learning more about about using the Force.com IDE though, definitely check out developer.force.com.
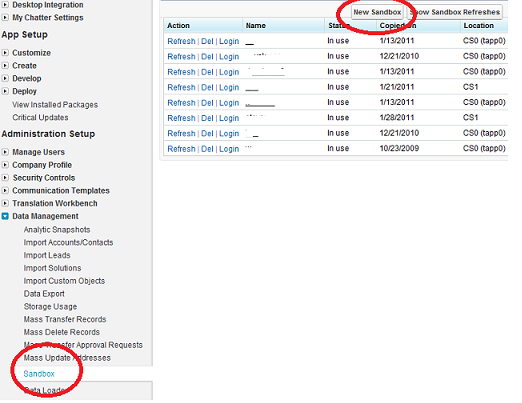
First things first, we need to create a sandbox. One of the nice things about the license donation for nonprofits is that we get sandboxes to work in. These are replicas of the schema, or structure of your database (without data), and provide a safe environment for us to test out our code in. You can create a new sandbox by going to Setup->Data Management->Sandbox, and then click on ‘New Sandbox’.
You’ll need to give it a name, preferably something descriptive (Sandbox1, Sandbox2, Sandbox3 may make sense now, but come talk to me in six months when you’re trying to figure out what’s in each of those sandboxes…). It may take a few a moments (or longer) for your sandbox to be created, and you’ll get an email once it does. When you get that email, follow the provided instructions for logging in. You’ll go to http://test.salesforce.com instead of http://login.salesforce.com, and your sandbox name will be appended to the end of your user name for your new sandbox user: username@useremail.org.[sandboxname] Once you’re logged in, you can always look in the top-right hand corner to determine the sandbox you’re in. In this case, I’m in a sandbox called ‘kbromer’. (So much for descriptive names, eh?)
You’ll also need to setup a Deployment Connection between your sandbox and your production org, since we’re going to deploy code using Change Sets. It’s a bit beyond the scope of this post to dive into, but there’s lots of documentation available on how to do this.
Planning
75% of writing successful code is proper planning. (Yes, that’s a completely made-up figure, just know its REALLY important. If you really want to know how important it is, go check out Code Complete, a tome devoted to the topic, amongst many other things.) First, we need to understand what exactly a trigger is. Salesforce tells us:
A trigger is Apex code that executes before or after the following types of operations:
- insert
- update
- delete
- merge
- upsert
- undelete
So in other words, when I do some verb/action to a record (insert, update, delete, etc.), Salesforce checks my list of triggers and says: “Are any of these valid here?” Seems easy enough to understand, but WHEN Salesforce checks, before or after my verb/action, is the key to understanding triggers. We’ll discuss that more in a moment.
Let’s setup a problem, then talk about the various decisions we need to make before we start coding.
Problem: “Every time I set a campaign member to ‘Responded’ when the campaign type is equal to ‘Training’, I want to check a custom box called ‘Has_Training__c’ on the corresponding contact record, indicating they’ve completed my training. I’ll ignore Leads attached to campaigns, as well as campaigns with the incorrect Type field value.”
This is a dicey problem for a couple of reasons:
1. We need to handle the fact that we can update multiple campaign members at the same time.
2. A campaign member can be a contact OR a lead
3. We need to make sure if we change them from responded to not responded, we uncheck the box.
4. If we delete the campaign or campaign members, what will happen to the checkbox?
Now, the planning part:
When should this trigger fire, before or after my action? Oddly, in this case, we could do either, since we’ll have the value for our contact available to us when we insert the record. However, if we were reliant on a formula field, workflow, or rollup summary value, we’d always want to use the after trigger, since that only fires after everything else happens on the record. In this instance, we’ll use the after trigger for simplicity. The most common use-cases I’ve seen for before-triggers are really complex custom validations of records, as well as de-normalization for reporting, but there are plenty of others as well.
What actions should my trigger fire on? Ideally, all of them. We’re going to ignore the merge for simplicity’s sake, you’ll want to keep an eye out for it though in your own scenarios (it actually fires off a couple of different actions. Check out the docs here for more info). We’ll also want to decide about the undelete. If we simply leave the checkbox as checked on deletion of the record, we can safely not worry about an undelete, since the checkbox would still be checked after the delete. If we want the delete to uncheck the box, we’ll need to decide how to handle the undelete scenario as well. To make things a bit less complicated (this is 101 after all!), we’re going to ignore both the delete and undelete scenarios, just know they exist, and some special rules apply (dicey issue #4). I’ll try and point them out where appropriate. We’re also not going to uncheck the box if they change from a responded status to a not responded status (dicey issue #3). Again, it will just make things a bit simpler. (Also note, upsert is a combination of insert and update, we cover our upsert scenarios by covering inserts and updates)
Alright, so now we’re down to: “After insert or update of a Campaign Member, if its for a Contact and set to ‘Responded’, and the Campaign Type is ‘Training’, set the Contact’s Has_Training__c field to True (in other words, check the box). If I delete the campaign member after they’ve already responded, OR if I change them from responded to not responded, my Has_Training__c field will not change.”
Bingo, let’s build that.
Construction
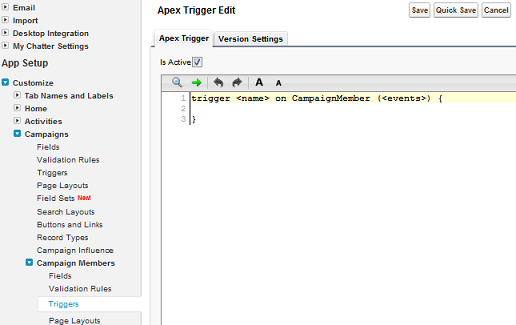
We’re logged into our new sandbox org, and we have a valid deployment connection configured, time to start building. Setup->Customize->Campaigns->Campaign Members->Triggers and then click ‘New’. You’ll see a screen like this:
We’ll need a name. Naming conventions for things like triggers and classes cause furious debate amongst geeks (“debate” is an understatement, its actually something more akin to holy wars). While I’m likely to be accosted for saying so, I’m going to go out on a limb and suggest, for the VAST majority of us, it doesn’t really matter, name it something you like and is relatively descriptive. I’m going with: CampaignMemberAfterInsertUpdate. (Brevity, in case you hadn’t noticed, was never my strong suit)
We also need to put in our events. Just a comma separated list of when we want our trigger to fire will suffice. For us, that’s after insert, and after update. So now, our new trigger looks like this:
Okay, easy enough so far. Now things get complicated. We don’t just get one record at a time in Salesforce, we get potentially lots of records all at once, so we need to deal with collections and items in bulk. I could spend the next 5000 words solely on how collections work, but I’m going to ask you to do your own research on that. The really really short version of what you need to know is this: trigger.new is the name of the list of all the campaign members who were just inserted and updated. (Any guess on what trigger.old is? Trick question, it depends on if it’s an insert or update. If its an insert, trigger.old is nothing. Not in the Nietzsche-sense of the word, think more Zwicky, its there, but you can’t touch it, feel it, or use it. And if you do, you might implode the universe. Or at least your code. If it’s an update, trigger.old has all of the OLD versions of the records you just updated. This is REALLY useful, but only directly available in the trigger itself. Lots of good info trigger context variables, including maps and other collections is available here and here.)
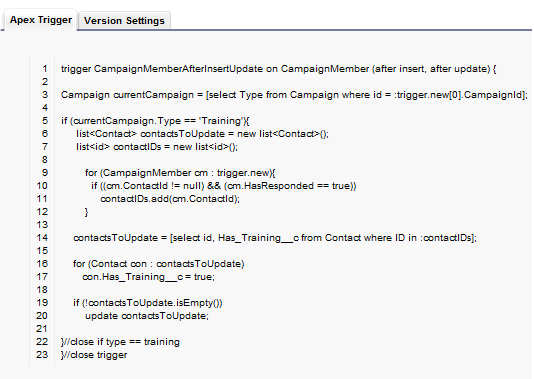
First, let’s figure out if we’re actually getting Campaign Members from a Campaign with its type set to ‘Training’. We can do this by cheating a little, and using the first record in our trigger.new collection in a query to get our current Campaign. That looks like this:
Campaign currentCampaign = [select Type from Campaign where id = :trigger.new[0].CampaignId];
(Two side notes here: First – We could just grab the text of the type field, but I prefer to get the whole object. It prevents silly null variable issues, its cleaner, and if we ever want to change this trigger or add additional criteria, we already have the Campaign record in memory. Second – Getting the Campaign like this can actually be a terrible idea. The danger is that if you bulk upload campaign members with different campaigns, you’re going to treat them all as if they’re loaded with whatever campaign the initial record had associated with it. Just know, if you use this trigger, and then bulk upload a bunch of new campaign members with different campaigns, you’re going to get unintended results. You’ll be safe if you only bulk upload campaign members from the same campaign. There are some ways to protect yourself for this, but they complicate our trigger a little bit, and this is still supposed to be 101. Just don’t say I didn’t warn you.)
Once we have that info in our variable called ‘currentCampaign’, we can now check the type to determine if we want to go any further in our trigger. Good old ‘if’ comes in here. If our type is good, we’ll also setup two new lists that we’ll use later on. So our next lines look like this:
if (currentCampaign.Type == 'Training'){
     list<Contact> contactsToUpdate = new list<Contact>();
     list<id> contactIDs = new list<id>();
If the Type of our campaign, currentCampaign, is ‘Training’, start by creating two new empty lists, one a collection of contacts called contactsToUpdate. The other a collection of IDs called contactIDs. Leaving the contactsToUpdate aside for just a moment, what’s with the collection of IDs? Well, we need to go and get a list of contacts we want to update, but since our trigger is on Campaign Members, we can only access fields on Campaign Member. BUT our Campaign Member object has a contact ID on it, if it’s connected to a contact. We need to create a list of those IDs, so we can query Salesforce for a list of Contact all at once. We do it his way so that we can control the total number of queries we send to Salesforce. Remember, we have a limit in the number of queries we can fire in one transaction, so we need to be smart. By getting our IDs ahead of time, we can get all of the contacts that need updating in one query, instead of querying for a contact for each Campaign Member. Our next lines look like this:
for (CampaignMember cm : trigger.new){
if ((cm.ContactId != null) && (cm.hasResponded == true))
contactIDs.add(cm.ContactId);
}
For each Campaign Member in our trigger, if the Campaign Member has a ContactID field, and their hasResponded field is set to true (this happens if a Campaign Member has a status that has the value of hasResponded), then add that Campaign Member’s ContactID to our list of IDs. Now that we have our list, lets go and get the Contacts we need to update:
contactsToUpdate = [select id, Has_Training__c from Contact where ID in :contactIDs];
Get a list of all the contact who we have IDs for. In other words, who are part of our training campaign, and have their hasResponded field set to true. We’re almost home-free here. Now, using the same style ‘for’ loop we used for our Campaign Members, let’s go through our contact list and check their Has_Training__c boxes:
for (Contact con : contactsToUpdate)
con.Has_Training__c = true;
For each of our contacts in the list, set the Has_Training__c box equal to true, or, in other words, check the box. Finally, if we have contacts in that list (and we probably do), update them, then close our open brackets (quick note: anything after the ‘//’ is a comment, and is not actually IN the code) :
if (!contactsToUpdate.isEmpty())
update contactsToUpdate;

}//close if type == training
}//close our trigger
To break this statement down a bit, I’m saying “if my collection contactsToUpdate is not empty, send it to Salesforce to be updated.” The ‘!’ negates the .isEmpty(), so its the opposite of how it looks. Now, let’s put it all together:

Construction Wrap Up
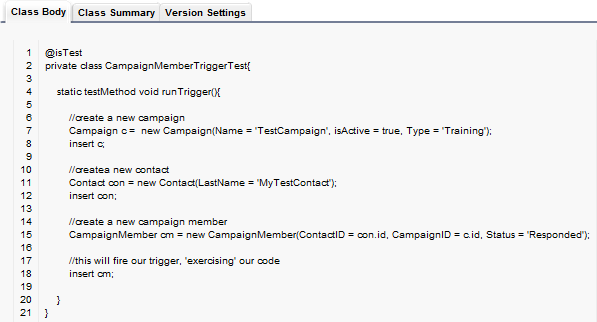
Not too shabby for a days work, eh? All done now, right? Well… maybe, but probably not. Chances are we’re going to be missing this nasty little thing called “Code Coverage”. Salesforce wants to make sure your code is valid, strong, and doesn’t start chewing into everybody’s shared resources. It does this by making sure your code has test coverage. Tons and tons of stuff has been written about test coverge, including inventive ways to get around it. I’ll save you some digging, and provide you with a class that exercises this trigger. You may need to include it in your deployment to validate the trigger. You can create a new class by going to Setup->Develop->Apex Classes, then click ‘New’ to create a new class. Add in the following code, save it, and include it in your deployment package if necessary (really important note: this is only going to work for our trigger above and in no way represents ‘best practices’ around testing and unit test construction. Once you start building your own, you’ll want to have at least a cursory understanding of code coverage and testing):
Final Notes
This is by no means a gentle 101 introduction. Writing code can be tough but incredibly rewarding, not to mention efficient in many cases! Salesforce actually makes it alot easier than it used to be by providing you with some great tools and abstractions to make the job just a tad more intuitive. Hopefully this will empower/inspire you to dive in and get your hands a little dirty. Here’s a quick secret: I was a political science major as an undergrad. Like many people, learned how to code by diving in head first, chewing through tons of test environments, and occasionally (okay, often) crashing the family computer in my younger years (nice thing about Salesforce? Can’t crash your computer anymore :)). The great thing about a sandbox is you don’t need to worry, its there for you to play in and learn the ropes, so don’t be intimated by what we’ve worked through. I’d also encourage you to read some more about triggers, including some best practices around architecture.
Finally, if you’re ever interested in peeking under the hood of the Nonprofit Starter Pack to see how we code triggers, classes or test methods, I highly encourage you to check out our Google Code repository, where the actual NPSP code lives. You’re free to browse, download, share and learn. It’s entirely open source and has contributions from many different individuals throughout our community. What will you add with your new coding skills??


