(Note: This post was originally published in the February 2011 Salesforce Foundation newsletter. There is a small correction provided in the body)
Introduction
One of the more common questions I get running the non-profit starter pack goes something like this:
“I have a very unique and unusual situation. When XYZ happens in my organization, I need to make sure that ABC happens as well. Is this even possible without some voodoo-mystical code?”
This generally leads to three distinct thoughts for me, in order of occurrence:
1. “That’s not unusual; we’ve helps lots of orgs with that problem!”
2. “Why do so many people use the term ‘voodoo-mystical’ when they email me?”
3. “There’s so much automation that’s possible without code in Salesforce – and workflow is probably the answer here.”
So with those thoughts in mind, I thought we’d provide a quick workflow introduction and some quick and easy workflow recipes for non-profits and the Non-Profit Starter Pack (NPSP). Some of these you may have seen elsewhere before, but hopefully some will be new to you as well.
Quick Workflow Overview
If you’re not familiar with workflow, and are using the NPSP, you’re already a frequent workflow user. Check out Setup->Create->Workflow & Approval ->Workflow Rules in your org to see all of the rules that come with the NPSP. Workflow is already managing your preferred phone and email settings on your contact records, no code required.
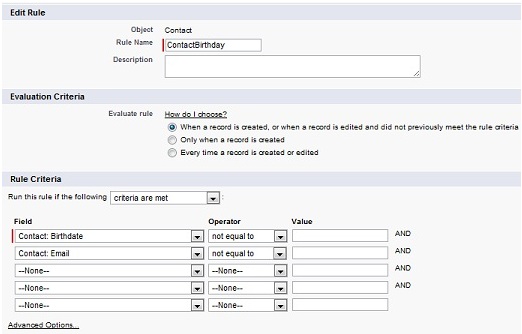
There are few main steps in building a workflow rule. Let’s click on the ‘New Rule’ button on our Workflow Rules page and build a classic birthday reminder rule together so we never forget to wish another donor a happy birthday. After we’re done, I’ll share some other quick workflow recipes you can implement today!
1. We need to select the object to which the workflow rule applies. Or, in other words, workflow happens when a record is inserted/updated/deleted. What kind of record do I want to my workflow to trigger off of? In this case, let’s select a ‘Contact’ and click next.
2. A few sub-steps here:
a. Provide a rule name
b. Select the Evaluation Criteria. In this case, I want my criteria to be evaluated when the record is first created, and then again any time the record did not meet the criteria previously. So our first radio button will work
c. Now we need to define our Rule Criteria, and this is where it can get a little confusing. Since we’re working with birthdays though, we want to use ‘Run this rule is the following ‘criteria are met’. We’ll talk formulas in a few paragraphs. Now we need to define our criteria. In this case, we want a rule to be created every time a contact is created with a birthday, or edited to add a valid birthday. So we use a little inverse logic here. Instead of saying ‘When Contact:Birthdate is equal to any value’, we’re going to say ‘Contact: Birthdate’ then ‘not equal to’ and then leave the value column blank. So when the Contact:Birthdate is not blank (has a value), we want our criteria to run. We’ll also make sure they have an email address saved in the same way. Click ‘Save & Next’
3. Now we need to add a workflow action. In other words, when a contact is entered or updated to include both a birthday and an email address, what should we do? We could do something immediately, but what if it’s not the contacts birthday? We don’t want to be emailing them on a random Tuesday in March if their birthday is in May. So, instead we turn to Time-Dependent Workflow.
a. Add a time trigger so that the workflow will be put in a queue until the time we define. In this case, I want my workflow to happen 1 Hour before my Contact: Birthdate. Click ‘Save’
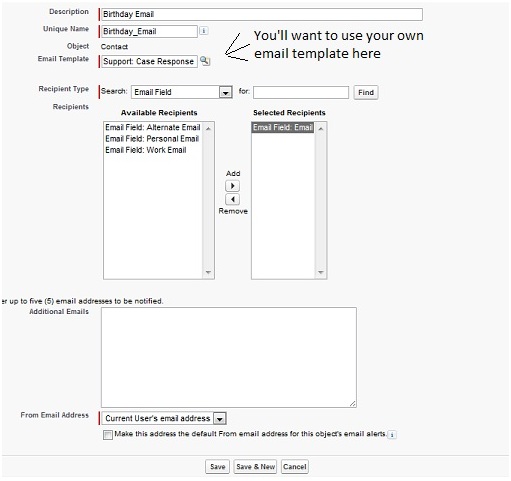
b. Use the ‘Add Workflow Action’ in the Time Dependent Workflow Action section, and select ‘New Email Alert’. Provide a Description of the Action, and select an Email Template. You may want to create a separate email template for your birthday emails. Here, we’ll use a random sample template as an example.
c. Our Recipient Type is ‘Email Field’, then ‘Email Field: Email’ from the pick list below. Click ‘Add’ to place it in the ‘Selected Recipients’. In the NPSP, the ‘Email’ field should always contain the preferred email for your contacts. Remember, we’ll have an email since our workflow won’t fire if it doesn’t exist! Click ‘Save’.
Final step: Click ‘Done’. When you return to the Workflow Rule screen click ‘Activate’, crack open a beverage of your choice, and marvel at how easy it is to automatically email your most valued contacts on their birthdays, without you having to even think about it. (This is a great one to modify for membership renewals too!)
(IMPORTANT NOTE: After this was originally published, a user pointed out a fundamental flaw in the above setup – this workflow will fire a day before their birthdate, not their birthday. Unless you’re a newborn, not very useful. Fortunately, there’s a fix. Please see the following thread in the NPSP forum for more discussion: forum discussion )
Other Handy Workflow Rules
We’ve covered the basics, so let’s talk about some other rules you can use.
ED Follow-Up Notice
Want your ED to handwrite thank you notes for any donation over a certain amount? Easy, start assigning him or her tasks via workflow. On Opportunity:
When a record is created or edited and did not previously meet criteria, and the following criteria are met: Opportunity Amount greater than 5000
Add workflow action ‘New Task’ assigned to your ED’s user. Provide a subject, status, unique name and priority, and click the ‘Notify Assignee’ checkbox, with a due date of the opportunity close date plus 7 days.
Your ED will now get an email that they have a new task assigned to them to thank this donor within seven days of the donation closing, with a link back to the donation they need to thank. Isn’t assigning work to others great?
Automatically Setting Donor Tier
If you have donor tiers or status based on cumulative giving totals, this is an easy one to help keep those tiers in up-to-date. (This assume you have a ‘Donor Tier’ picklist on contact) On Contact:
When a record is created or edited and did not previously meet criteria, and the following criteria are met ‘Contact: Total Gifts’ greater than $10000.
Add workflow action ‘New Field Update’. Field to Update ‘Donor Tier’, set a specific value: ‘Platinum’.
Activate Campaigns by Default
Campaigns are de-active by default. I think this is done intentionally to drive me insane. I create a campaign, go to look for it, and it doesn’t exist because I forgot to check the ‘Active’ checkbox. Workflow helped restore my sanity. On Campaign:
Only when a record is created and the Active field equals ‘False’
New workflow action, field update, set ‘Active’ field to ‘True’
Advanced: Automatically Confirm Address Changes
When an address changes for our contacts, and we have a valid email, we can automatically send an email to the contact asking them to confirm the address change. You can also use a similar rule to keep an eye on any text field and trigger an action if it’s updated or changed. The key is making sure we don’t send out an email if it’s a new address, or if it’s a brand new record. We’ll use a formula to do this. (For the sake of brevity, we’ll cheat a little and only check the mailing street address, we could easily duplicate the logic to look at other fields as well) On Contact:
Every time a record is created or edited (we can’t use time-based workflow, so we need to select the third evaluation rule), and the formula below evaluates to true:
AND(NOT(ISNEW()), NOT( ISBLANK( MailingStreet)), ISCHANGED(MailingStreet), NOT(ISBLANK(Email)), NOT(ISBLANK(PRIORVALUE(MailingStreet))))
(Logic: If the record is not newly created, and the mailing street is not blank, and the mailing street is different than then previous mailing street, and the email field is not blank and the previous value of the mailing street was not blank, run this rule.)
Send a new Email Alert to the contact, just like in our birthday email above. We’ll probably want an email template asking the contact to confirm their address change with the new address in the email.
Hopefully you found some of these examples useful, I highly encourage you to dive into workflow and try out some rules of your own, it’s a great way to dip your toes into the world of automation and hands free database maintenance. Please make sure to share your results, questions and tips back with the community!


